Demo reel and Breakdown Sheet
DEMO REEL PASSWORD: nicole2024
SHOT BREAKDOWN
Below is some highlights of my shot breakdown, FOR FULL LIST OF SHOT BREAKDOWNS PLEASE DOWNLOAD PDF HERE
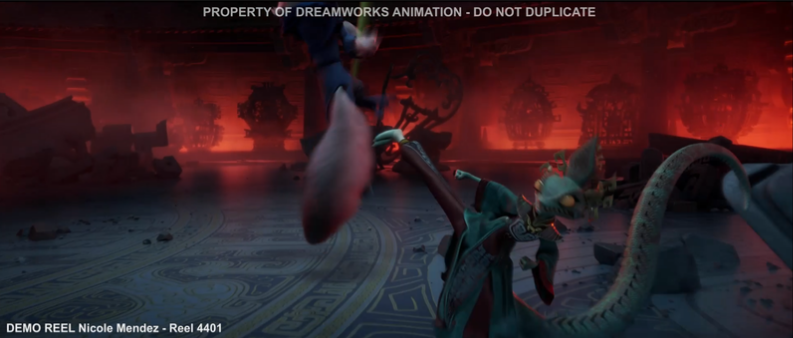
Kung Fu Panda 4
My work on this feature consisted of doing cloth and fur simulations and shot clean up when needed. A lot of work revolved around achieving animation focused notes, so I worked on a lot of artistic direction to match what our animators could not achieve our of the rigs, for a lot of shots and notes we would be given drawings for key poses or motions ad we had to follow through with those notes.
Software: Houdini, Maya, Qualoth
Cloth and fur simulation for all characters. This shot was a real challenge because of a combination of a very short time constraint, the lenght of the shot, and the extreme movements. It was very important to keep Chameleon’s robes easy to read and match key posses the director’s wanted. My work flow for this was firstly going through the animation and cleaning up all the necessary posses we wanted to hit to use as an object to constrain our cloth to so we can animate the constraints to turn on and off as needed to help us hit certain shapes. After than I decided to split up the simulation into 3 separate scenes to simulate the pants, robes, and sleeves separately to make the simulation run faster and avoid messy collisions, blending them all together in a finaling scene from caches saved on drive. Similar to this I would cache out simulation in chunks, so we could have approved chunks of the shot without possibly loosing data, and making it easy to go back an iterate over previous simulations. This was incredibly handy because I could stop at a certain point and sculpt messy frames to fix simulation issues, or help push the cloth to a certain shape so the rest of the simulation could follow it, instead of re simulating until I got the desired shape.
Trolls 3
My work on this feature consisted of doing cloth and fur simulations and shot clean up when needed. A lot of the notes revolved around making sure materials reacted the way you would expect them to at the scale they were designed, and manually adding a lot of secondary motion to things like hair and cloth and random objects in the world to make sure they felt alive. There was also a lot of shotsculpting to make sure characters kept strong shapes and read well.

Software: Houdini, Maya, Qualoth
Responsible for all fur and cloth simulation for characters. For this shot, the directed wanted the smaller character going into the hair to go in in a very cartoony motion, so we wanted to keep the gap between the hair bangs closed as he jumped in instead of parting completely. I did most of the work by manually keying deformations to create the hole he goes into after simulating a soft collision going through the hair to get a little motion on the tips, but blending the roots back to animation and then adding the “hole” deformation animation over that. Along the way we dealt with several technical issues we had to resolve to make sure we ha da high enough resolution curve and that the render hair was wrapping to the curves correctly since we wanted a very clean split down the middle of the hair.
Sonic the Hedgehog
During my time on Sonic I worked both running shots and as a Key Artist helping other people troubleshoot their shots, assigning shot briefs, and giving feedback to other artist to speed up the approval process. Among other things I was in charge of doing a lot of the one-off shots in our sequences, which involved using cloth rigs we built quickly or hadn’t had time to develop but needed fast turnaround under the tight schedule we were under.

Software: Maya, ncloth, Furtility.
nCloth simulation for seaweed over sonic, and Furtility to use Primvars to actively displace the fur under the sea creatures and seaweeds to avoid simulation.
These seaweed shots were really fun to work with because even though while pretty straight forwards the animators added some fun movents to Sonic that made it very enjoyable to play adding secondaries with the jiggling seaweed. The challenge in these shots was getting the seaweed to look like it’s properly pivoting from his head but at the same time not going through his quills, so we couldn’t do just a dirty wrap on his head to glue the seaweeds to his head at the end since it would look to obvious, so I had to create a small set up were we could automate some clean up pre-simulation to clean up a lot of the quill intersections before simulation and give up better and more consistent results than what the skinning from the rig gave us, cutting out post sim clean up and adding consistency through all the artist shots since we noticed if we left it up to individual artist to clean up the seaweeds they would often end up in different spots and cause noticeable continuity errors on screen.

Software: Maya, ncloth, Furtility.
nCloth on underwear, and Furtility to use Primvars to actively displace the fur under the underwear and Sonic’s hands to avoid simulation.
For this shot it was a lot of trial and error in order to get the artist look correct since we wanted to make sure we didn’t cover his big eyes/expressions but at the same time sold the gag of having the underwear covering his face. The second challenge was grabbing aspect which we achieved by having multiple sims that we blended together and then used as a stepping stone to simulate one fluid continues shot (while the workflow was slightly desctructive, it allowed for fast iterations and easy manipulation to cut and piece together the parts supervisors liked). The grabbing part was done by attaching multiple Component to Component constraints to each finger so we could key the rest length of each constraint to mimic collision and friction with the hand without having to do a lot of clean up in the hand and animation since there wasn’t too much space for proper collisions to start with.

Software: Maya, ncloth, Furtility.
nCloth on Sonic’s shirt, and Furtility to use Primvars to actively displace the fur under the shirt to avoid simulation.
This shot got handed to me pretty close to the end of the project and we had about a day or two to turn over and was a matter of hitting some very specific poses and beats. As for the look, sim wise it was a matte of eliminating most of the gravity and keying a wind field to push the cloth away at the proper time, then after we got most of the proper movement and timing we wanted we went in and added a few stronger shapes that would take us too much time to get simulating.

Software: Maya, ncloth
nCloth to simulate blanket.
We needed to extend the blanket covering Sonic in this shot because the on set prop was showing and compositing was not able to roto it out by themselves, so this was a team up between our departments to get as much of a clean extension as possible. Early on we decided that the cut off line for the cg takeover would be from Tom’s thumb up, which meant not only did we have to match the wrinkles near the connection point but that we needed to cover his arm halfway in order to give comp a clean cut and not have them have to do too much clean up (I believe the only areas they decided to fade back to the original plate was in the far top right corner, everything else was very clean cut CG)
I was giving a plain unwrapped sheet that I first simulated to fall over a static version of sonic, then with some CC constraints I adjusted the rest length to get tight wrinkles in the general area, then used that geo and sculpted it to match one of the first frames when its on screen. This was then wrapped to the Sonic we got from match move and acted as out animation geo, which we used to simulate. After simulating it was a matter of doing heavy deformation work to make sure the wrinkles and edges lined up to plate as much as possible, which was the most time consuming part of this since we technically didn’t have match move for the blanket itself, so it was my job to go back in and smooth out any kinks in the animation to make it look as integrated as possible.
Maleficent: Mistress of Evil
I worked on a few shots in this movie, most of them centering around sculpt enhancements and plate to CG takeovers. The sculpts where the most interesting parts because we had some very highres detailed faces to work on which allowed for very detailed enhancements.

Software: Maya
Used deformers to enhance facial features on green fairy
In this particular shot, the skinning the rigg had given us had left us with a version of the acrtress who looked much more “manly” than she looks like in real life, since she has very slim and pointy facial features, this made her face stick out so I had to go in and resculpt her entire jawline and cheekbones along with her neck in order to get a much more fateful representation of the actress the fairy was sculpted after. The rig also was limited in some other aspects so I had the chance to push her facial features to augment the look of surprise on her face, so I had to animated a few expressions on top of what the animators gave us using deformers.
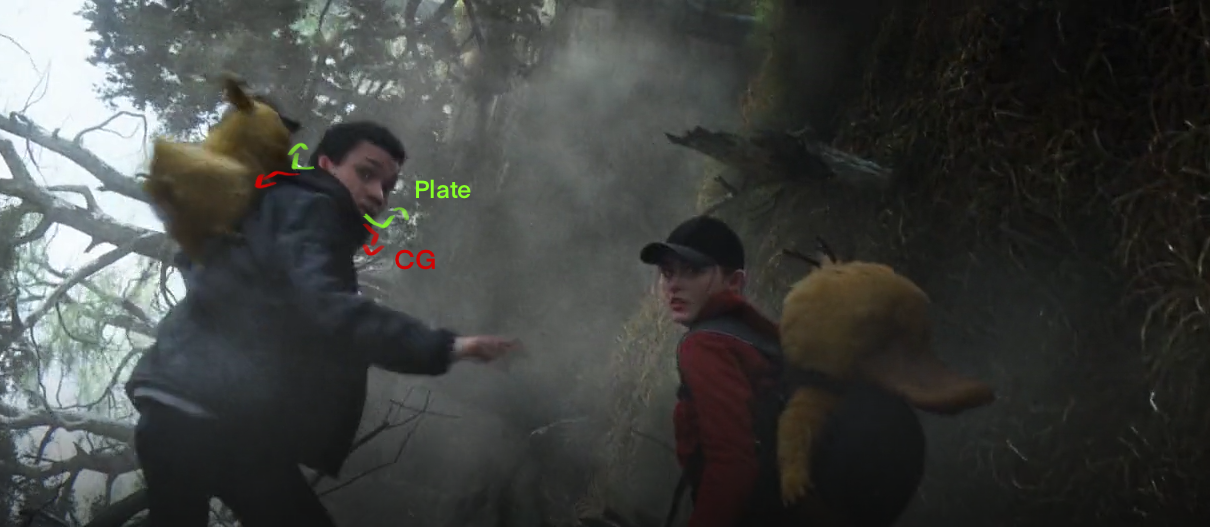
Pokemon: Detective Pikachu
Most of my work on Detective Pikachu was focused around building a cloth rig that would survive very heavy levels of motion but still hold up close to camera. To start with, I was handed a pre-built cloth rig for Tim(so the cloth and output meshes had already been set up), but I was in charge of actually setting up the materials, constraints, and so forth that would be passed along to other artists. Some of these hurdles I was able to conquer by simulating the characters in space and faking all the movement with fields, giving us more artist freedom to get the look we wanted. But this trick wouldn’t work for every situation so I was able to set up a group of constraints we could turn on and off depending on what we needed so we could simulate in space when the shot required it without having to test cloth materials every single shot. Along with lots of cloth, we had to do a lot of roto-animation refinements on the digidoubles since it’s such an interaction/integration heavy show, this would make sure that our geometry would match our plates as best as possible..
Software: Maya, ncloth, nHair, Furtility.
nCloth simulation for Tim’s jacket, shirt, pants, and Pikachu’s hat ribbon. Furtility and nHair fur simulation on Pikachu.
On this shot of them jumping over the trees it required us to do a takeover frame for just the face, so we had to line up the jacket collar to plate to have a transition point between plate and CG.

Full CG digidoubles
Software: Maya, ncloth, nHair, Furtility.
nCloth simulation for Tim’s jacket, shirt, pants, and Pikachu’s hat ribbon. Furtility and nHair fur simulation on Pikachu.
In other cases we would have take-overs with harsher transitions like this one, where the left side of the tree is CG but the right is plate, transitioning as the camera rotates around the tree trunk. I had to make sure the cloth sim would match the plate as much as possible so it wouldn’t look out of place. In this case, since the digidouble was so close to camera we had to up-rez the geometry so we could add more wrinkles.
To avoid heavy simulation times, I simulated the jacket and shirt mesh first and wrapped the higher resolution topology to this simulation, using an in house wrap deformer to fake even more wrinkles and detail at a lower cost.

Plate for comparison
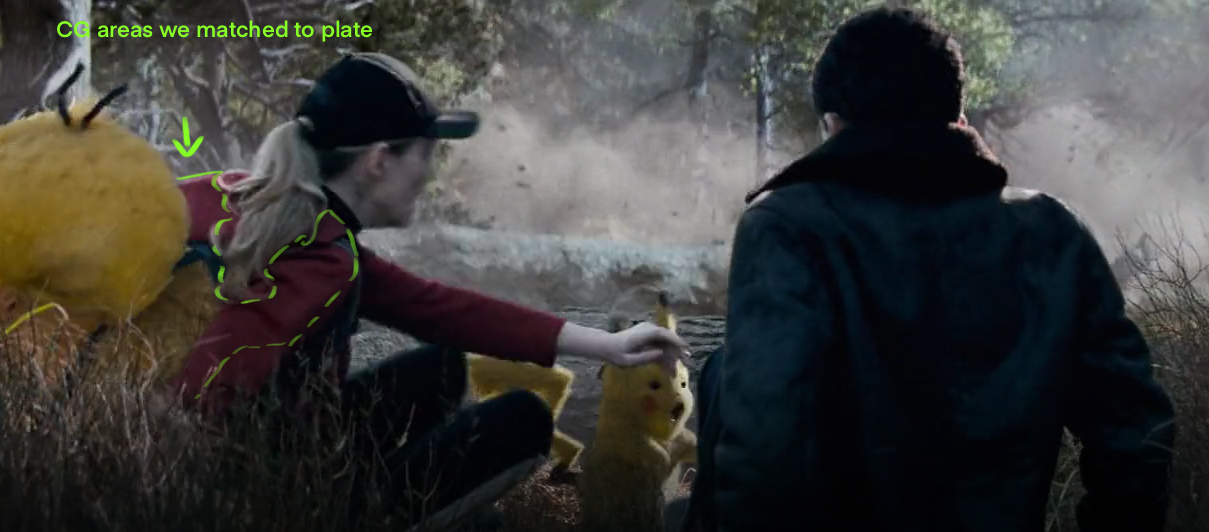
Software: Maya, ncloth, nHair, Furtility.
nCloth simulation on Psyduck’s baby bjorn and Pikachu’s hat ribbon. Furtility fur simulation for Psyduck and Pikachu. nHair fur simulation for Pikachu’s tail.
As mentioned before, we had a lot of blending CG with plate, in this case the focus was on getting Psyducks baby bjorn not only to track properly with the body, but also to cover up the real backpack Lucy was wearing on set. I used in house deformers to move geometry so it could match plate better, I’ve circulated the areas where comp used our digidoubles to transition into the plate (Lucy’s hood is CG and so are the edges of her sleeves). We also simulated the straps and parts that covered the body in order to get a more natural look.